

Kitchen Basics Bootcamp


Whether you are a novice cook or know your way around the kitchen, honing your knife skills is not only important for keeping you safe but will make your recipes that much better. Ingredients that are cut uniformly cook at the same rate and result in a dish that is cooked properly throughout. Since each piece of food is cut in the same fashion, the finished dish will have a nice presentation.
This tutorial will cover the correct way to hold a chef’s knife as well as how to grip the food with your other hand to avoid cutting yourself.
Knife Skills
Proper Chef’s Knife Grip, Outer View
This photo shows the appropriate way to grip a blade. Note how the index finger is wrapped fully around the blade. The index finger and thumb should be opposite each other on either side of the blade while the remaining three fingers are sort of loosely curled around the handle.
You should be gripping the knife mainly with the thumb and forefinger. If you find that you’re tightly clutching the entire handle of the knife, just relax and loosen your hold. With practice, you’ll get used to this grip, and soon any other grip will feel unnatural to you.

Photo_Concepts/Getty Images
Secure the Food With the Guiding Hand

Laurence Mouton/Getty Images
Now that your knife hand knows what to do, you need to make sure your other hand does as well. Your non-knife hand is called your “guiding hand,” and its job is to hold the food to keep it from sliding around on the cutting board. This puts that hand in a uniquely dangerous position. With the knife blade quickly moving up and down, you need to keep those fingertips tucked safely away, while still being able to firmly hold the food.
The grip shown here is called the “claw grip”—by keeping the fingers curled inward and gripping the food with the fingernails, the fingers stay out of harm’s way. The side of the knife blade should rest against the first knuckle of the guiding hand, helping keep the blade perpendicular to the cutting board.
Alternate Claw Grip
In this modified version of the claw grip, the first knuckle of the guiding hand rests flat on the ingredient, with the fingers again curled inward safely. This time, the knife rests against the second knuckle rather than the first.
Both of these claw grips is acceptable, so use whichever one you feel comfortable with. You may want to start off with chopping an onion to practice getting comfortable with how to use a chef’s knife.
Joe Watts/EyeEm/Getty Images


Danilo Alfaro
Large Dice
The large dice is a culinary knife cut measuring 3/4 inch × 3/4 inch × 3/4 inch. This square cut is most often used for vegetables like potatoes, and sometimes fruits such as watermelon.

Danilo Alfaro
Batonnet
The batonnet (pronounced bah-tow-NAY) is basically creating a rectangular stick that measures 1/2 inch × 1/2 inch × 2 1/2 to 3 inches. It is also the starting point for another cut, the medium dice.

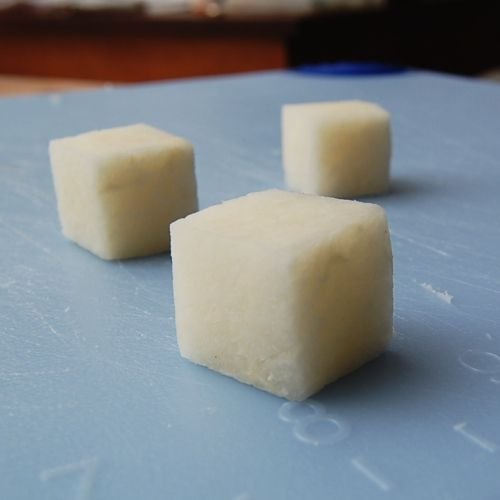
Medium Dice
The medium dice measures 1/2 inch × 1/2 inch × 1/2 inch, and is a smaller version of the large dice. This is generally a good choice when recipes don’t specify the size of the dice and the ingredient list just says “diced tomatoes.”

Danilo Alfaro
Allumette
Measuring 1/4 inch × 1/4 inch × 2 1/2 to 3 inches, the allumette is sometimes referred to as the “matchstick cut.” It’s also the starting point for the small dice.

Danilo Alfaro
Small Dice
The littlest of the dice cuts, the small dice measures 1/4 inch × 1/4 inch × 1/4 inch and is produced by slicing the allumette into 1/4-inch sections.

Danilo Alfaro
Julienne
The julienne cut measures 1/8 inch × 1/8 inch × 2 1/2 inches and is basically the allumette cut once more lengthwise. You will most often use this cut for carrots, celery, or potatoes, and see the thin strips used as a garnish.

Danilo Alfaro
Brunoise
The brunoise knife cut (pronounced BROON-wahz) measures 1/8 inch × 1/8 inch × 1/8 inch, which makes it the smallest of the dice cuts. Brunoise is usually used for garnishes.
6 Keys to Taking Care of your Knives
1. Handle knives with respect. Knives can be damaged if they are handled carelessly. Even though good-quality knives are manufactured to last a lifetime, they are still prone to damage if not properly taken care of.
2. Keep knives sharp. Learn the proper techniques for both sharpening and honing knives. A sharp knife not only performs better, but is safer to use because less effort is required to cut through the food. There are many ways to sharpen knives. Use a stone periodically, a sharpening machine, or send them to a professional cutlery sharpener.
3. Keep knives clean. Clean knives thoroughly, immediately after using them. Sanitize the entire knife, including the handle, bolster, and blade, as necessary, so that the tool will not cross-contaminate food. Do not clean knives in a dishwasher.
4. Use safe handling procedures for knives. There are standards of behavior that should be remembered when using knives. When you are passing a knife, lay it down on a work surface so that the handle is extended toward the person who will pick it up. Whenever you must carry a knife from one area of the kitchen to another, hold the knife straight down at your side with the sharp edge facing behind you, and let people know you are passing by with something sharp.
When you lay a knife down on a work surface, be sure that no part of it extends over the edge of the cutting board or worktable. Also, do not cover the knife with food towels, equipment, and the like. Be sure the blade is facing away from the edge of the work surface. Do not attempt to catch a falling knife.
5. Use an appropriate cutting surface. Cutting directly on metal, glass, or marble surfaces will dull and eventually damage the blade of a knife. To prevent dulling, always use wooden or composition cutting boards.
6. Keep knives properly stored. There are a number of safe, practical ways to store knives, including in knife kits or rolls, slots, racks, and on magnetized holders. Storage systems should be kept just as clean as knives.
Keep your Knives Sharp
Preparing Your Stone for Sharpening
The process of preparing a sharpening stone for use is similar no matter what type of stone you have, whether it's a India stone, water stone, or oil stone. Follow these steps to ensure safe and efficient sharpening:
1. Place the stone on a damp cloth or towel, and make sure both of these are on a flat surface. This helps prevent the stone and towel from sliding during sharpening.
2. Begin with the coarse side of the stone on top, as this is the quickest way to form the knife blade back into the correct shape.
3. Lubricate the stone. Check the documents that came with your sharpening stone to see whether it requires oil or soaking in water before using.
IMPORTANT: Food oils such as vegetable and olive oil should never be applied to sharpening stones! Only use honing oils that are approved for sharpening stones.
Some options like diamond stones don't need any lubricant at all, so be sure to check the stone's instructions.
How to Hold Your Knife For Sharpening
Perhaps the trickiest and most uncertain aspect for anyone new to sharpening stones is learning the correct angle for the knife. It's recommended that knives be sharpened at a 20-degree angle, and these simple steps will make it easy for you to find the correct angle.
· Hold the knife with the blade down, at a 90-degree angle.
· Move the knife to a 45-degree angle, halving the distance between the 90-degree angle and the table.
· Once more, move the knife to half of the remaining angle, and now you have a good estimate of the appropriate sharpening angle. Adjustments can be made up or down as needed.
How to Sharpen Kitchen Knives with a Sharpening Stone
Once you've found the correct angle for your knife, you can begin sharpening. Here are the steps you need to follow to sharpen your kitchen knives:
1. With your knife at a 20 degree angle, slowly draw the knife down and across the stone in a smooth motion, starting at the heel and finishing at the tip.
2. Repeat this action 5 times. You may need to repeat this motion additional times, depending on the dullness of the knife.
3. Flip the knife the other side and sharpen the reverse side using the same motion. You should sharpen this side the same number of times as the other side for consistency.
4. Return the knife to the original side, but this time draw the knife from the tip to the heel. Repeat this motion 5 times.
5. Flip to the reverse side and sharpen from tip to heel five times.
6. Turn your sharpening stone over to the fine side and repeat steps 1-5.
Calibrating your Thermometer 101
The Ice-Water Method
Fill a large glass with ice and then fill it with cold tap water. Stir the ice water and let it sit for 3 minutes. Place your thermometer in the ice water, making sure to stick the probe at least 2 inches into the mixture, but not to touch the sides or the bottom of the glass. Stir the ice water with the probe to even out the temperature of the water and prevent the probe from resting against an ice cube. Wait at least 30 seconds for the thermometer to read the temperature. The temperature on your thermometer should read 32°F or 0°C. If it does not, adjust the nut on the thermometer, turning the head until the needle lands on 32°F
How to Calibrate Digital Thermometer
To Calibrate a digital thermometer look for the reset or “DH” button, push it while its in the cold water.
Yield Test
Yield in culinary terms refers to how much you will have of a finished or processed product. Professional recipes should always state a yield; for example, a tomato soup recipe may yield 4 gal., and a muffin recipe may yield 24 muffins. Yield can also refer to the amount of usable product after it has been processed (peeled, cooked, butchered, etc.)
For example, you may be preparing a recipe for carrot soup. The recipe requires 5 lbs of carrots, which you purchase. However, once you have peeled them and removed the tops and tips, you may only have 3 lbs. of carrots left to use.
In order to do accurate costing, yield testing must be carried out on all ingredients and recipes. When looking at yields, you must always consider the losses and waste involved in preparation and cooking. There is always a dollar value that is attached to vegetable peel, meat and fish trim, and packaging like brines and syrups. Any waste or loss has been paid for and is still money that has been spent. This cost must always be included in the menu price.
How can calculating yield percentage benefit professional chefs?
Calculating yield percentage helps professional chefs determine the exact amount of food they need to purchase and prepare, allowing them to manage costs efficiently.
Does yield percentage calculation account for cooking losses?
No, yield percentage calculation focuses on the weight difference before and after trimming or processing food items. Cooking losses must be assessed separately.
How does yield percentage calculation help in portion control?
By knowing the yield percentage of a food item, one can accurately determine how many portions can be obtained from a certain amount of raw food.
How to calculate yield percentage in food?
Calculating yield percentage in food involves a simple formula that considers the weight of the trimmed or processed food and determines the percentage of usable product. To calculate yield percentage, follow these steps:
1. Determine the weight of the raw or unprocessed food item.
Start by weighing the whole food item before any trimming, processing, or cooking takes place.
Example: a banana weights – 6.5 ounces
2. Weigh the trimmed or processed food item
After completing the necessary preparation steps, weigh the food item again, considering the removal of any inedible parts, such as skin, bones, or fat or peel.
Example: a banana weights – 4.2 ounces 3. Divide the weight of the trimmed or processed food by the weight of the raw food.
Example:– 1.54 ounces
4. Multiply the result by 100 to obtain the yield percentage.
Multiply the quotient from the previous step by 100 to express the yield percentage as a whole number.
Yield Percentage = (4.2 / 6.5) x 100 =64.62%
For example, let’s say you have a whole chicken weighing 3.31 lbs and after removing the skin, bones, and fat, the trimmed chicken weighs 2.2 lbs. To calculate the yield percentage:
Yield Percentage = (2.2 / 3.31) x 100 Yield Percentage = = 66.47%
Therefore, the yield percentage of the chicken in this case would be approximately 66.67%.
Mise en place
Is a French culinary phrase which means "putting in place" or "gather". It refers to the setup required before cooking, and is often used in professional kitchens to refer to organizing and arranging the ingredients (e.g., cuts of meat, relishes, sauces, par-cooked items, spices, freshly chopped vegetables, and other components) that a cook will require for the menu items that are expected to be prepared during a shift.